
Technicolor Color Assist - Workflow

Having used the Technicolor Cinestyle profile in the Canon 7D, I was very interested in the release of Color Assist by Technicolor as a grading tool. Color Assist is a low cost grading tool that fits easily into an editing workflow and provides real time performance. Although it is a low cost solution ($99) like with any software that offers a trial copy, I downloaded the trial to kick the tyres and see what it can offer, where it would fit in my workflow, and whether it would fit it. Bearing in mind that I have access to Apple Color, Adobe SpeedGrade, Magic Bullet, and of course the built in tools found in FCP and Adobe Premiere. What I have come up with is a list of small enhancements and modifications to workflow that will enable:
- Basic Workflow
- Multiple secondaries in Color Assist.
- Compound looks
- Organising your saved ‘looks’ on a per project basis
- Using Color Assist with read only media sources.
Also, for my fellow countrymen, apologies for mixing up the spelling of ‘color’ and ‘colour’, for everyone else, the correct spelling is ‘Colour’ (you can thank Noah Webster for all the confusion!!)
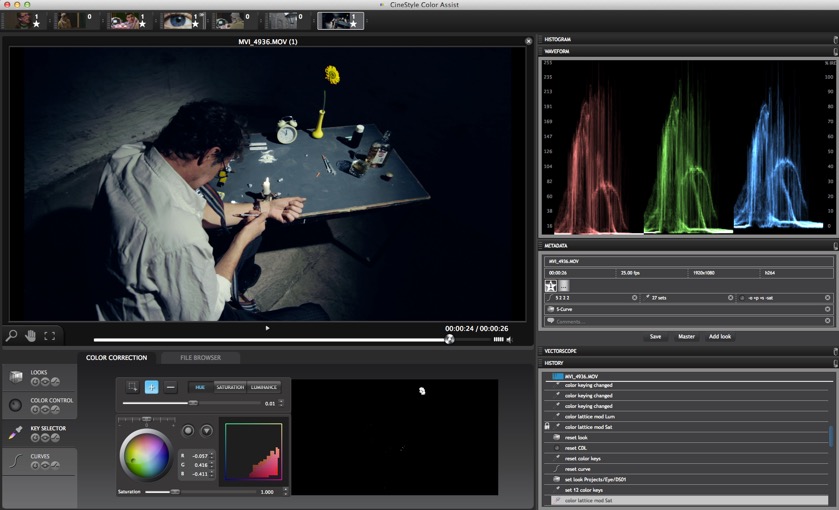
The Interface
On opening Color Assist, the first thing to note are the four main correction tools:
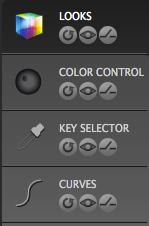
Also note that there is only one of each. I’m not 100% sure of the order they get applied, but my understanding is that they are stacked from bottom to top. I will only briefly discuss the tools as there is a manual aand quick start guide that comes with the product.
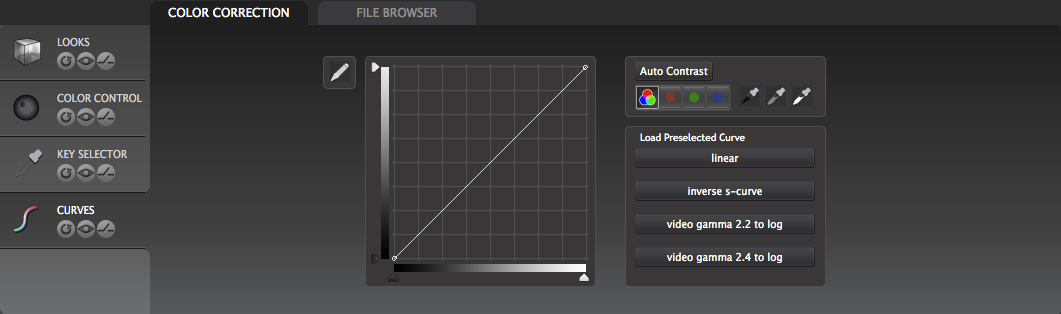
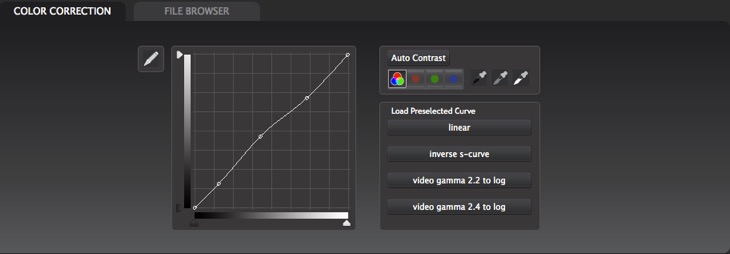
First off, you have the curves tool giving you control over the master image and the red blue and green channels independently, This is where I would normally start balancing out the shot and getting the contrast set. You can set the blacks, mid-tones and highlights by either using the eyedroppers or the curves or both. Additionally there are some presets for conforming your clip. Aside from being able to add points and pull the curve, the pencil tool enables you to draw your complete curve from scratch.
One example use for this, in the simplest form, is to draw an ’S’ curve here to add the required contrast back to your Cinestyle clip, however, you may want to use the ’S’ curve preset in the looks section. Technicolor have already built you one!! Remember you only have one of each of the tools, so if you can use a preset as a starting point you can then use the curve tool independently. I will build on this later and you will see how you can compound looks and effectively get further ‘rooms’. So for example, you may want to apply a curve, some colouring, a secondary another curve, more secondary. This may not at first seem possible with Color Assist, but it is!
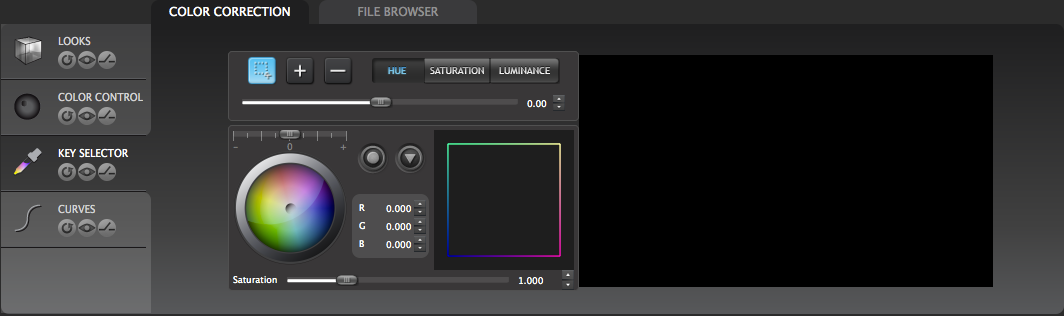
Next we have the key selector which our secondary control. With this you can select a range of colours you want to work with either by using the box select tool or the + an - buttons. Then you can make alterations to hue, lightness and saturation.
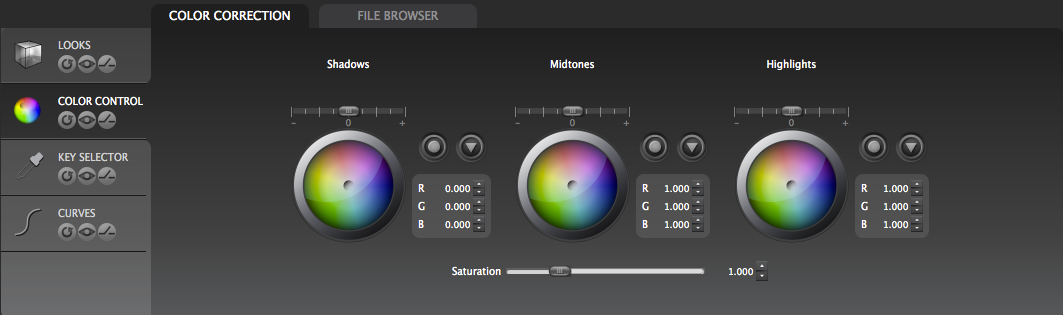
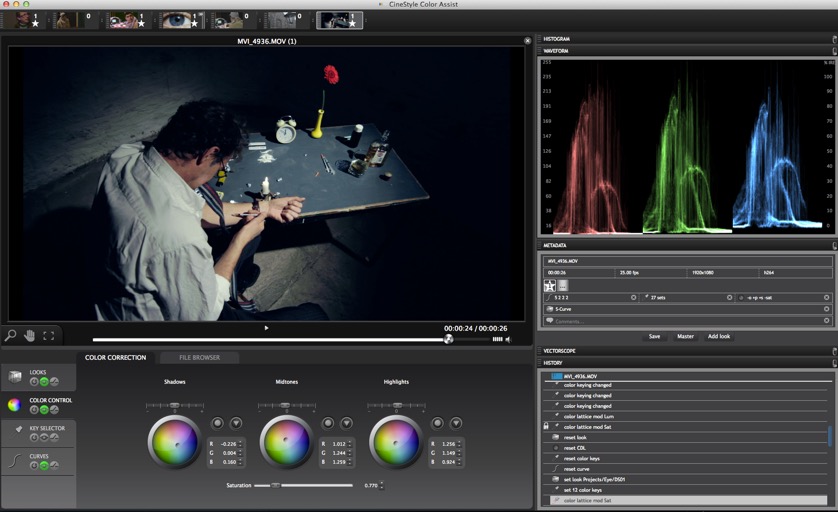
The colour control section offers three colour wheel for the shadows, mid tones and highlights. There is a lot of flexibility in this ‘room’ with luminance, colour balance, and saturation. You can also pull each of the values separately with the R G B controls in each tonal range.
Each of the tools has the following controls:
The first icon RESETS the control.
The Second icon Solos the effect. There is no bypass or mute on a single control. If you want to bypass just one control you need to SOLO all the others.
The last icon is bypass all. This is on all controls and does the same thing, turns off the grade. A quick way to see before and after.
Ground Rules
So with that very very basic introduction out of the way, some ground rules:
1. Color Assist works by saving a special file next to your clip. This file contains all the information required to produce the 9 grades available. (has an extension of .xcsl)
Pros:
Because the file is stored with the media, it simplifies the ‘media offline’ issue. In other words if your media file is offline, so will be your color file. Equally if your media is online, your editing software, and the color assist software, will have access to the colour file. This may seem obvious, and may seem trivial, but it’s important. The plugin (which I have not tried yet as the version I have is the trial version) looks for this file, so having all the info in one file next to the media simplifies things.
Cons:
If you have read only media sources, you won’t be able to save the colour grades so it all falls apart, but I have a workaround for this, so be patient!
2. Each clip has a maximum of 9 grades, all the grades are contained in the color file (.xcsl file)
Pros:
Nine grades are designed so that you have 9 options available, in realtime, in your editing software. 9 different looks at a click of a button, awesome!
Cons:
One .xcsl file has 9 grades = 1 movie clip = 1 file. Yes one file. So, if you have say a 1 hour DV capture in a single file, even though your editing package may split scenes and chop it up into sub clips, the fact that it is one physical media file means you will only have 9 grades available. The way to workaround this slight limitation is to split your media into separate physical files so that 1 file = 1 clip.
3. You can have as many saved looks as you want. Looks are saved presets that are stored with Color Assist rather than each clip (in fact they are stored in ~/Documents/CineStyle). You would do this in order to make ‘Looks’ available to be used many times over.
Workflow Overview
This workflow overview is going to cover the following topics:
- Basic Workflow - Grading a shot
- Adding a secondary
- Saving the grade and the look
- Adding another secondary
1. Basic Workflow - Grading a shot
Below is a shot from a short film, that at time of writing, should have been finished months ago, but that’s another story. Looking at the RGB parade, you can see that this has been shot with the Cinestyle picture profile (raised blacks, muted highlights). The first thing I am going to do is add that ’S’ curve in to add some contrast back into the shot.
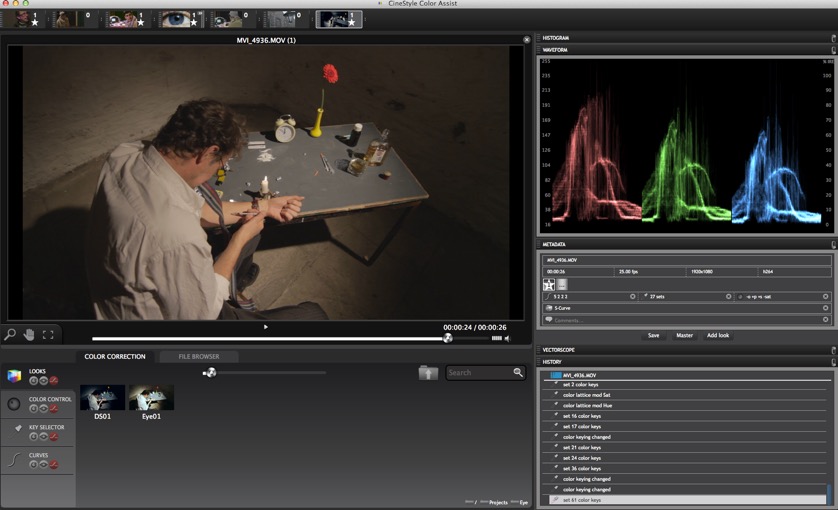
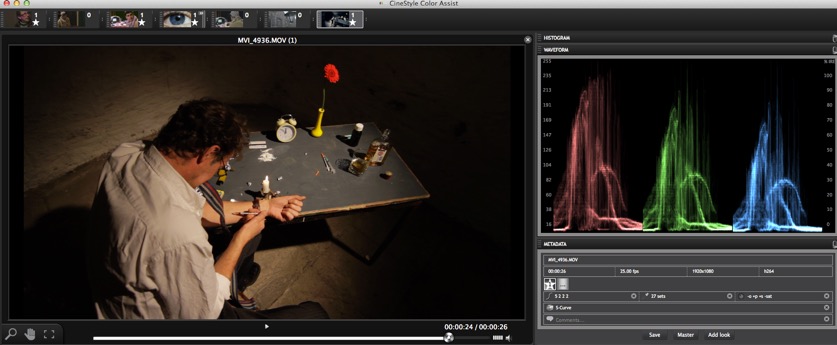
I have added the ’S’ curve by using the Look preset provided by Technicolor. To apply it , just double click on the look. The reason I have done this is that it leaves all the other controls (or ‘rooms’) free for me to make changes in. The result of the ’S’ curve is below. Notice that the RGB curves now touch the ground and the waveforms have been expanded, You can also see that more colour has been introduced (a result of adding contrast).
I wanted to make a few tweaks to the contrast to I have used the curves tool to add a custom setting by slightly pulling up the mid-tones. The truth here is that I did this after the next stage (colour wheels), and that’s what happens. There are no hard and fast rules.
I used the colour control section (the wheels) to add some style / grade to the clip. I wanted it to have a cool, uneasy look, hence the blue / green tint.
So that’s my grading done. However, for the sake of this article and to demonstrate the use of the secondary key control (and to show how to add multiple keys) and am going to ‘pretend’ that the colour of the flower needs to be changed from Red to Yellow (the director wasn’t happy, let’s say).
2. Adding a secondary
To do this (and it’s quite an ask when using H.264 7D highly compressed DSLR footage), use the selection tools in the ‘key selector’ tool to select the Red flower, and adjust the hue, saturation, and luminance controls (top right of the key selector control window) to further select the colour of interest. Now I use the colour wheel, the colour adjust, and saturation controls to adjust the colour of the flower, changing it from Red to yellow.
At this point, we can change no more. What I mean by that is that maybe I want to change the contrast, or color, if we do that we will affect the secondary key. Also, what if the director says ‘Thanks for changing the flower from red to hello, but now I want the vase changing from yellow to Red’ ARRRGGG!!. Don’t panic, there is a way of getting more secondaries.
3. Saving the grade and the look
We need to have a workflow.Save the grade as a ‘look’, and save the grade. Clicking on the ‘save’ button in the metadata area saves the work into the grade 1 slot. Now any changes you make, will be to a new grade slot. You are going to have to track these manually as Color Assist doesn’t give you control over which grade to save in or anyway to delete a grade. The only opportunity you get to choose a slot is when you run out and have to overwrite one! BUT, Color Assist has a comments area. I suggest you use this to keep notes, as you go, regarding what is in your grades.
Saving the grade in itself doesn’t help us to get any nearer to having multiple secondaries (or colour wheels or curves for that matter), it just freezes a look in a preset that gets save with your clip. What you need to do now is save that grade as a ‘Look’, that is, a preset that can be loaded into the ‘looks’ room of your next grade. As this is an ‘intermediary’ grade, and is probably only relevant to a specific clip in a specific project, you wouldn’t want these cluttering up your normal list of look presets.
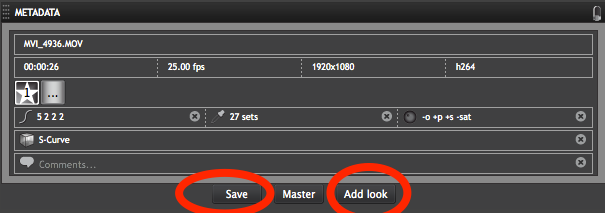
Go to the ~/CineStyle folder in finder and create a ‘Projects’ folder, then in that, another folder representing your actual project. For my example this will be ~/CineStyle/Projects/ITL.
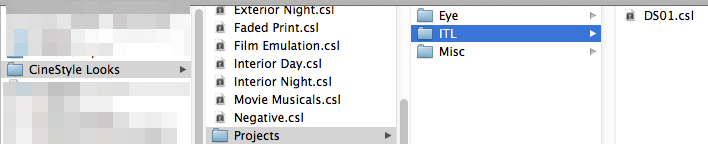
Click the ‘Add Look’ button and add the folder path and name to save the look in the project folder. For example, Projects/ITL/DS01

Note that the file stucture must be in place first. Color Assist will not tell you if it hasn’t saved the file or not! I would suggest having a Finder window to hand to ensure that your look has been saved. Why Color Assist doesn’t have a standard file/save dialog box is beyond me. It seems like it has been rolled.
4. Adding another secondary
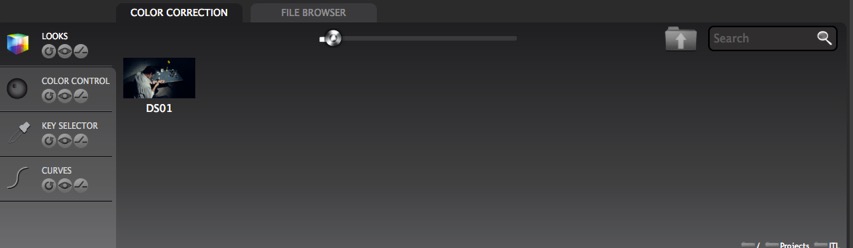
Anyway, with your new grade saved as a ‘Look’, we now start a new grade by clearing all the existing changes. Do this by click on the reset button of each control, the curves, key selector, color control, and looks. Go to ‘Looks’ and Navigate to the look you just saved and load this up as your starting point. This will apply everything you have just done including the work in the secondary to change the flower from red to yellow, but in one go. i.e. your curves, key selector, and color control ‘rooms’ are free. All the grade you can see, is contained in the saved ‘look’.
Now we are going to realise our directors request to change the Vase colour from yellow to Red. Go to the secondary and start picking yellow from the Vase. Interestingly, I noticed that it doesn’t select anything from the ‘yellow’ flower, I guess that under the hood the flower is still Red. In this example I am going to change the vase from red to yellow. Same procedure as the first secondary. Again, disclaimer, this footage isn’t really suitable for this kind of pulling, but still (to a point) I was able to pull it.

To finish off, remember to save the grade. So to recap what we have done:
- We have created a grade, including using a secondary to isolate a Red object
- We have saved the grade in slot 1 and save an intermediary look in a project related folder
- We have loaded the grade into a new slot and added another secondary to isolate a different color and saved that grade
Now if you decide that your original grade needs changing, you can go back to slot 1 and start altering it. This will start an edit in a new slot. You cannot edit a slot once the grade is ‘saved’, but if you click on a saved slot and start editing it will be loaded into a new slot anyway. From here you have access to the curves, etc to make your changes. When done you will need to resave the ‘Look’ preset then go your second slot, click on the ‘Look’ and reload the newly saved look. This is a bit of a drag, but like I said at the beginning, it’s a workaround. This is where you MUST keep notes, or use the comments box in the metainfo tab for each slot so you know what each one of your slots is for.
Write Protected Media Volumes
NOTE - Update now I have purchased Color Assist
The procedure I discuss below does not work with Premiere Pro and the plugin. Premiere Pro, extracts the real location for the media and stores that as the location, not the logical link. This procedure only works standalone with Color Assist.
As old fashioned as I am, I treat my digital media in the same way as tape (for your whipper snappers, I am not talking about gaffer tape, but if you don’t watch what you do, you will come unstuck!). That is, when I take my CF or SD card out of my device, the first part of my process is to create a read only image of the media. Why ? for three reasons.
- Keeps the media together in one lump, all the files as they came off the camera so no lost .THM files (which contain oodles of very useful information)
- By creating a mountable image, make my media more portable. I only ever need to copy one file around and when mounted on a different computer my media is in the same location.
- Read only means I don’t overwrite the source media files EVER! Probably something I could change as the second thing I do after creating the image is create three separate copies of it for archive and security.
Color Assist needs to have write access to where the media files are so that it can store the companion .xcsl file alongside the media. Now I have come unstuck after all, however, Unix is my friend (I need to get out more). The best solution to this is to make the volumes writable as a ‘working copy’ (keep your originals safe, always), and in my case, extend the size of the disk image to accommodate the extra files.
An alternative is to create an assets area in your video project and use the unix command line to logically link all the media files to that location. Then when editing, or using color assist, use the assets area as the source location of your media. Now what will happen is that your original media stays READ ONLY, and any additional files, such as the .xcsl files, will get written in the assets folder. As always, best illustrated by way of an example. You will need to open up Terminal for this next bit.
I have a mounted volume in /Volumes called ITLDTS-DAY1 and my media is in the subfolder DCIM/100EOS7D
My project folder is stored in /Volumes/Media/Projects/Video/ITL
- Create an Assets Folder:
mkdir -p /Volumes/Media/Projects/Video/ITL/Assetscd /Volumes/Media/Projects/Video/ITL/Assets/for file in `find /Volumes/ITLDTS-DAY1/DCIM/100EOS7D -type f`; do ln -s $file; done
This will create logical links to your mounted media. It must be to the files and not the directory, hence the for loop above. Clearly if you unmount the media the files won’t be available, but the .xcsl files will remain. Also, the next time you mount the media, the logical links will work once again, they are pointers, nothing more.
run the command:
ls -l
This will show the files (as below). Note I have used color assist to grade one of the clips and that is why you see the actual xcxl file in the listing below:
lrwxr-xr-x 1 declan staff 47 14 Mar 21:50 MVI_4566.MOV -> /Volumes/ITLDTS-DAY1/DCIM/100EOS7D/MVI_4566.MOVlrwxr-xr-x 1 declan staff 47 14 Mar 21:50 MVI_4566.THM -> /Volumes/ITLDTS-DAY1/DCIM/100EOS7D/MVI_4566.THMlrwxr-xr-x 1 declan staff 47 14 Mar 21:50 MVI_4567.MOV -> /Volumes/ITLDTS-DAY1/DCIM/100EOS7D/MVI_4567.MOVlrwxr-xr-x 1 declan staff 47 14 Mar 21:50 MVI_4567.THM -> /Volumes/ITLDTS-DAY1/DCIM/100EOS7D/MVI_4567.THMlrwxr-xr-x 1 declan staff 47 14 Mar 21:50 MVI_4568.MOV -> /Volumes/ITLDTS-DAY1/DCIM/100EOS7D/MVI_4568.MOVlrwxr-xr-x 1 declan staff 47 14 Mar 21:50 MVI_4568.THM -> /Volumes/ITLDTS-DAY1/DCIM/100EOS7D/MVI_4568.THM-rw-r--r-- 1 declan staff 786 14 Mar 21:58 MVI_4568.xcsl