
Grading with color
A Revelation

Although I have color as part of Final Cut Pro, I have not really got into it, even though it is a powerful tool.....until now! My eureka moment came when I realised how to round trip back and forth between FCP and color. Up to this point, I thought that color would have to be done right at the very end and hope that no more edits would be made. I can now build a workflow that enables me to see my graded footage, but to edit at speed without long renders.
Although I have color as part of Final Cut Pro, I have not really got into it, even though it is a powerful tool.....until now! My eureka moment came when I realised how to round trip back and forth between FCP and color. Up to this point, I thought that color would have to be done right at the very end and hope that no more edits would be made. I can now build a workflow that enables me to see my graded footage, but to edit at speed without long renders.
Final Cut Pro - Grading with Color
Having come from Sony Vegas to Final Cut relatively recently, one of my favourite plugins was Magic Bullet Looks. As I could transfer the license over from PC to Mac it was (initially) the natural choice. I like Magic Bullet, comes with some nice presets and a great set of tools for building different looks.
The main issue I have found with using MB is render time, both on PC platform and Mac. Now although FCP is much better with it’s render file handling than Vegas ever seemed to be, if certain changes are made, you will inevitably have to wait for your clip to render.
Personally, I like to see what the end product will look like, so once I am happy with the edit, I will apply the grading, and then render the sequence. All well and good, except now if I make picture changes or some types of edit, I may need to re-render clips and again wait. Sometimes when FCP starts, it has ‘need to render’ markers for clips that were rendered before.
For me, one of the important things when editing is to be able to keep up the rhythm, and I don’t want to have to stop for 5 or 10 minutes waiting for clips to render at every corner. Ideally, if I do need to re-edit, I want to turn off the filters, effects, and grading, and just get on with it, then when I am happy (or want to see it in a graded context), turn it all back on again. Unfortunately this puts me back in rendering hell
Alas, a solution is at hand, and a very nice one at that, in the guise of Apple Color. This is the grading package that comes with Final Cut Studio. Now as an app it is very different to FCP in terms of interface, but is a stunning grading tools once you get to grips with it. I bought the Creative Cow training DVD for Color which I thoroughly recommend.
The really interesting thing for me, was not the fact that there was already a tool for color grading, but in the way it handles the job. So you export your sequence from FCP to Color, fire up color, and there is your timeline, ready for the grading process, You spend your time grading your masterpiece, then save it, in Color. So Color saves it’s own format, whuch can’t be read by FCp, but don’t despair, there is an export to FCP function. What this does is sends, to FCP, a new sequence with the new visuals in it.
Great! Except that, two weeks later I need to re-edit. But does that mean that I now have to edit in color or FCP or both, as after all, they are maintaining their own, very separate, project files?
But I’ve moved clips around, changed the length of a couple of them and even added a new cutaway, now what ? I spent ages grading the first cut of my film, clip by clip. And now to the bit that blew me away. Go back to your original edit in FCP and make your changes, then go to File->Export->XML as below, and save the XML to disk.

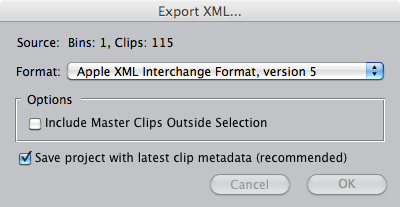
Now for the even easier bit, open up Color and load your original projects, then select File->reconform and select the Xml file. Color magically does it’s stuff, retaining the grades you had previously, where it can, and adding the trimmed clips and new clips to the timeline ready for the grading.
Once graded (and rendered of course), you can send it back to FCP. Now you still have to wait for rendering, but only on stuff that is new or has changed and further more, the version you edit is clean and rendering time doesn’t slow you down in the edit process.
Having come from Sony Vegas to Final Cut relatively recently, one of my favourite plugins was Magic Bullet Looks. As I could transfer the license over from PC to Mac it was (initially) the natural choice. I like Magic Bullet, comes with some nice presets and a great set of tools for building different looks.
The main issue I have found with using MB is render time, both on PC platform and Mac. Now although FCP is much better with it’s render file handling than Vegas ever seemed to be, if certain changes are made, you will inevitably have to wait for your clip to render.
Personally, I like to see what the end product will look like, so once I am happy with the edit, I will apply the grading, and then render the sequence. All well and good, except now if I make picture changes or some types of edit, I may need to re-render clips and again wait. Sometimes when FCP starts, it has ‘need to render’ markers for clips that were rendered before.
For me, one of the important things when editing is to be able to keep up the rhythm, and I don’t want to have to stop for 5 or 10 minutes waiting for clips to render at every corner. Ideally, if I do need to re-edit, I want to turn off the filters, effects, and grading, and just get on with it, then when I am happy (or want to see it in a graded context), turn it all back on again. Unfortunately this puts me back in rendering hell
Alas, a solution is at hand, and a very nice one at that, in the guise of Apple Color. This is the grading package that comes with Final Cut Studio. Now as an app it is very different to FCP in terms of interface, but is a stunning grading tools once you get to grips with it. I bought the Creative Cow training DVD for Color which I thoroughly recommend.
The really interesting thing for me, was not the fact that there was already a tool for color grading, but in the way it handles the job. So you export your sequence from FCP to Color, fire up color, and there is your timeline, ready for the grading process, You spend your time grading your masterpiece, then save it, in Color. So Color saves it’s own format, whuch can’t be read by FCp, but don’t despair, there is an export to FCP function. What this does is sends, to FCP, a new sequence with the new visuals in it.
Great! Except that, two weeks later I need to re-edit. But does that mean that I now have to edit in color or FCP or both, as after all, they are maintaining their own, very separate, project files?
But I’ve moved clips around, changed the length of a couple of them and even added a new cutaway, now what ? I spent ages grading the first cut of my film, clip by clip. And now to the bit that blew me away. Go back to your original edit in FCP and make your changes, then go to File->Export->XML as below, and save the XML to disk.
Now for the even easier bit, open up Color and load your original projects, then select File->reconform and select the Xml file. Color magically does it’s stuff, retaining the grades you had previously, where it can, and adding the trimmed clips and new clips to the timeline ready for the grading.
Once graded (and rendered of course), you can send it back to FCP. Now you still have to wait for rendering, but only on stuff that is new or has changed and further more, the version you edit is clean and rendering time doesn’t slow you down in the edit process.
blog comments powered by Disqus